That’s it, you should be able then to select the new version for deployment!
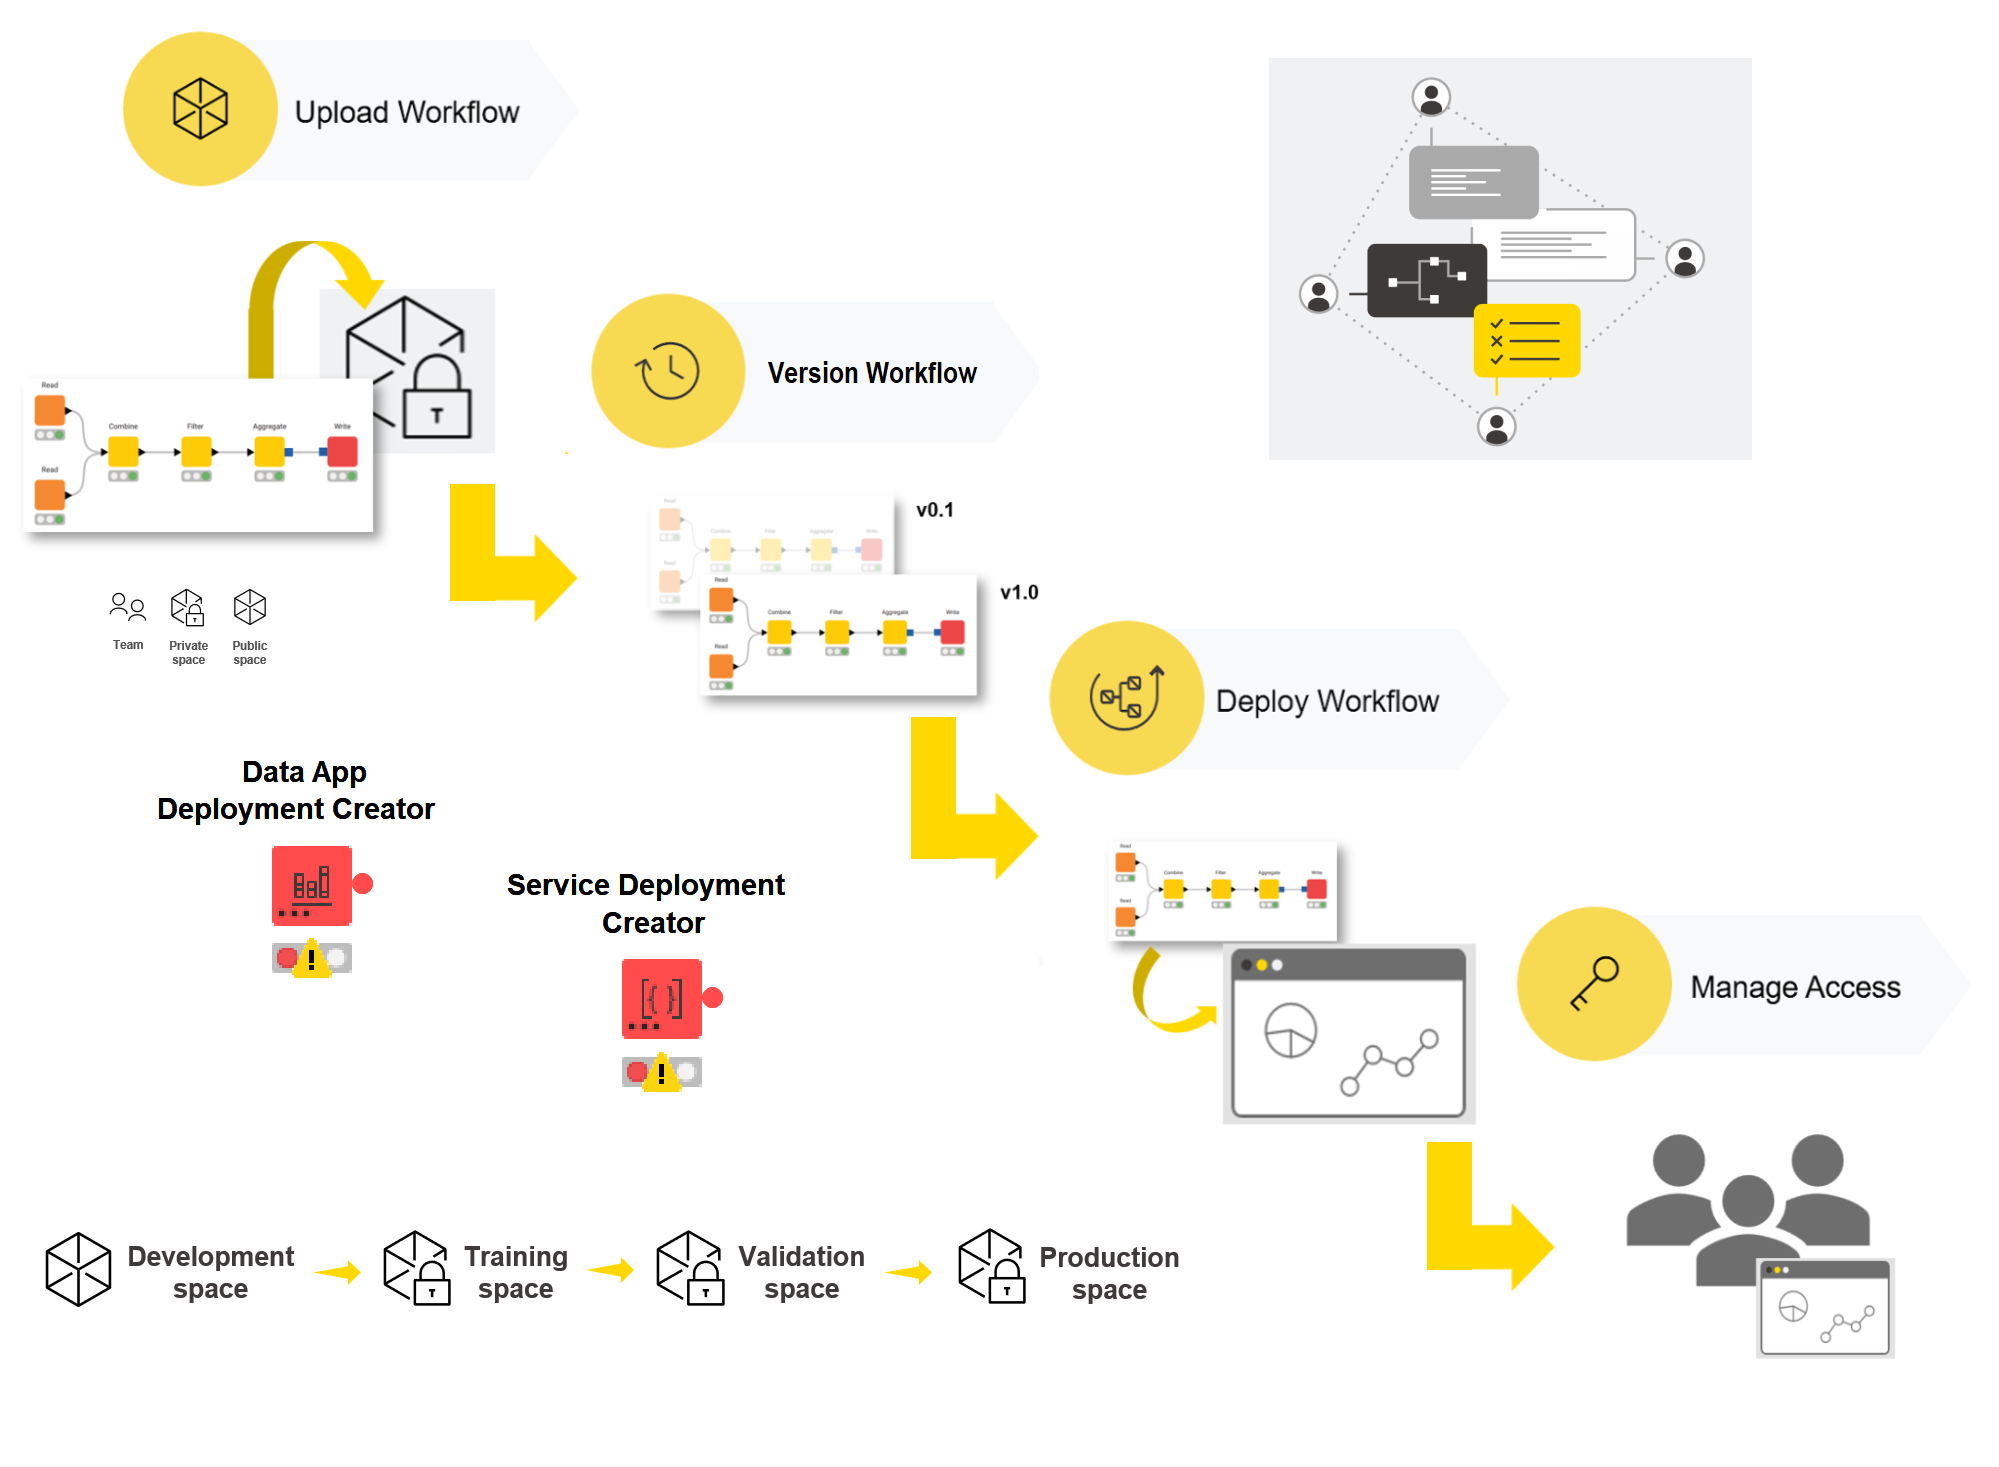
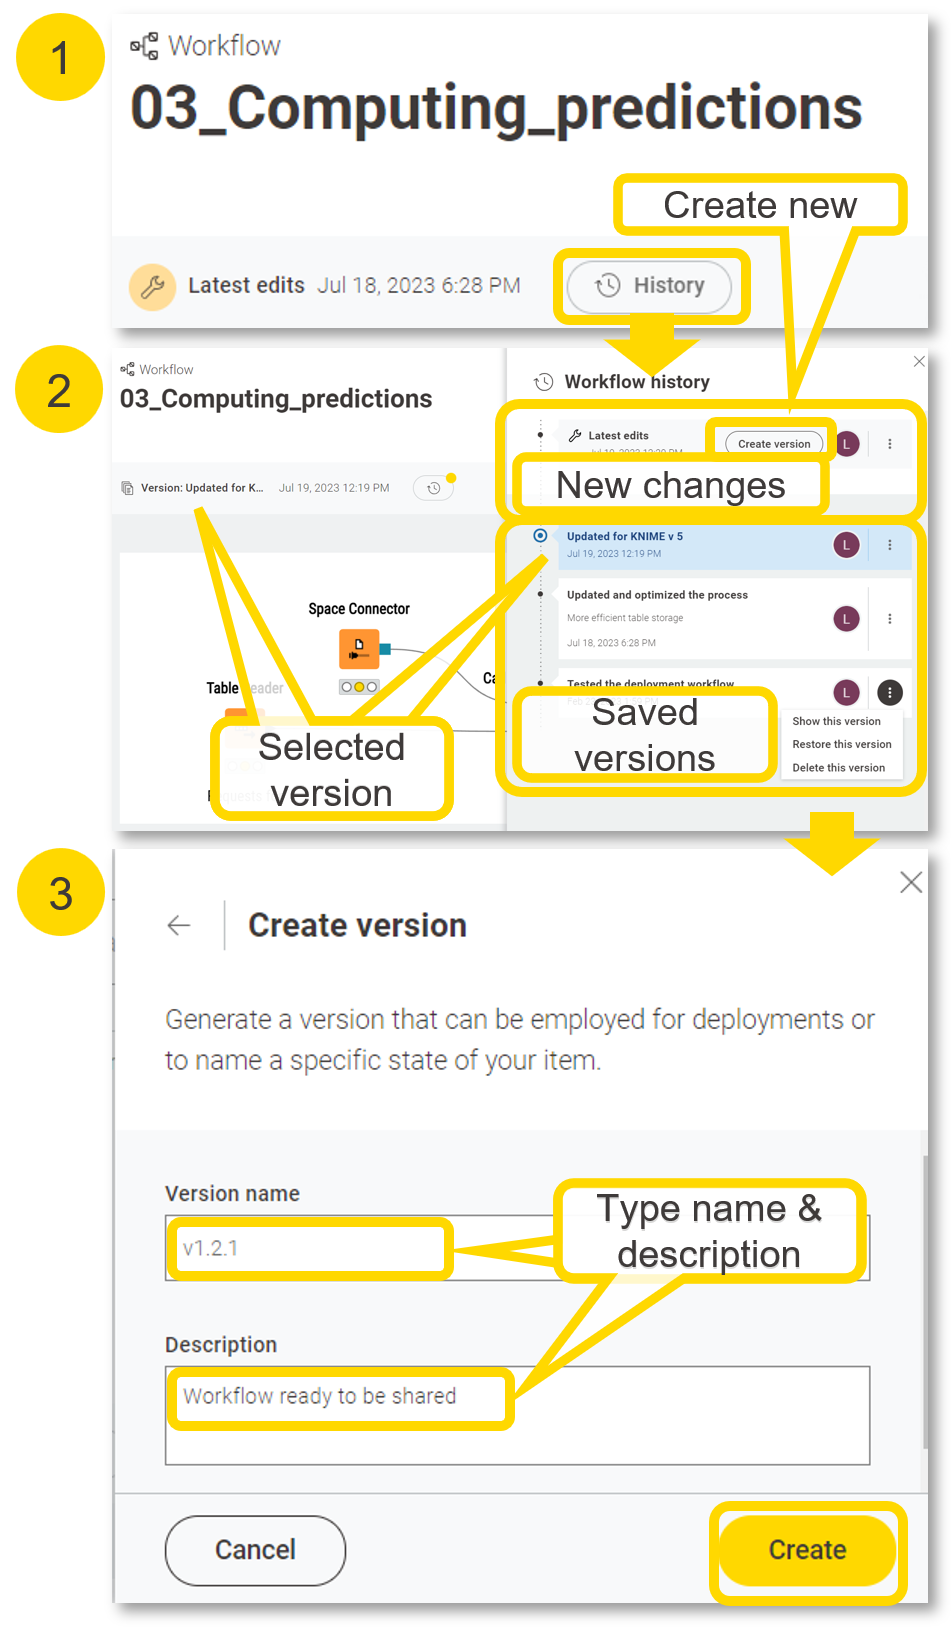
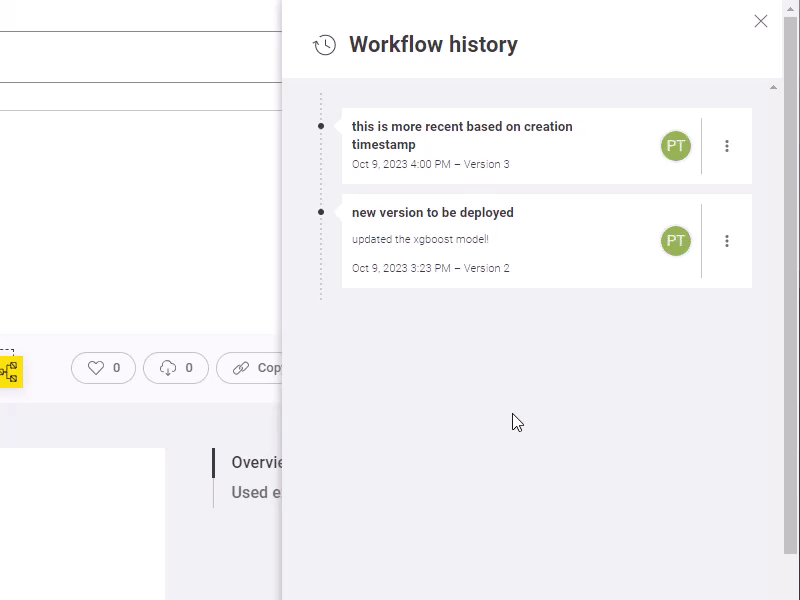
In previous versions of KNIME Business Hub you had to version the entire space the workflow was deployed in. This is no longer the case and versioning is now required and only available at workflow-level.
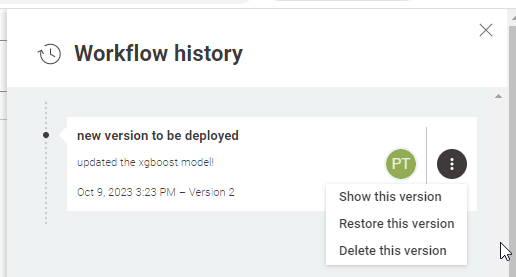
Different options are available for versions:
Show this version: display the workflow image and description of a previous version
Restore this version: roll back to a previous version as if you were uploading a new workflow with that previous version. That means that you will still need to create a new version to completely roll back!
Delete this version: remove this version from the list available in the workflow history panel
You can automate this and more by creating a workflow that versions workflows
Use nodes from the KNIME Hub Connectivity extension like:
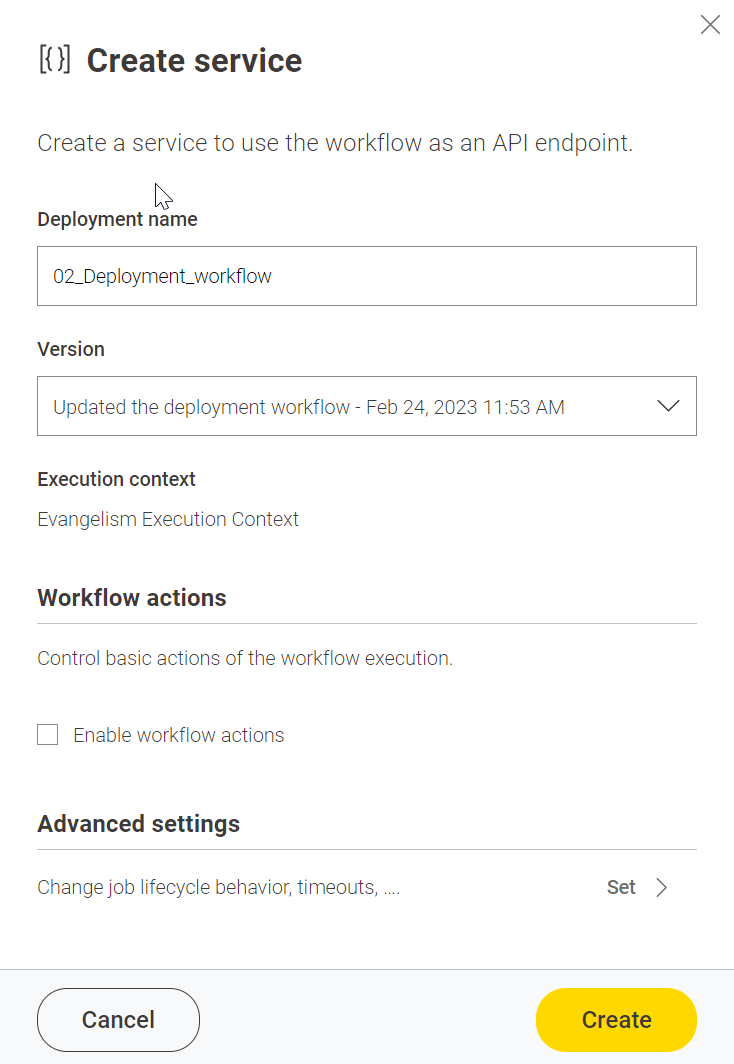
When you deploy a workflow as a service you basically create an API endpoint for anything or anyone to execute the workflow. The workflow, using container nodes, can receive and send back data using the API. This is one of the most common types of deployments. Related topics are: inference service/deployment, RESTful services, microservices architecture, orchestration and containerization.
When deploying a workflow as a service on KNIME Business Hub you can select the version if more than one are available.
To automate the creation of the deployment service from an uploaded workflow you can also use the following node in another workflow:
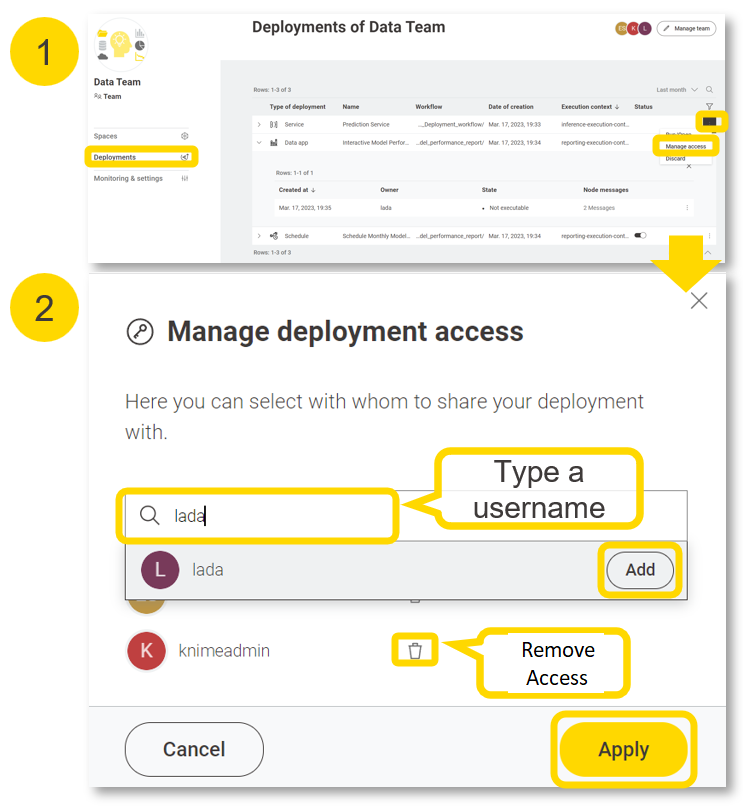
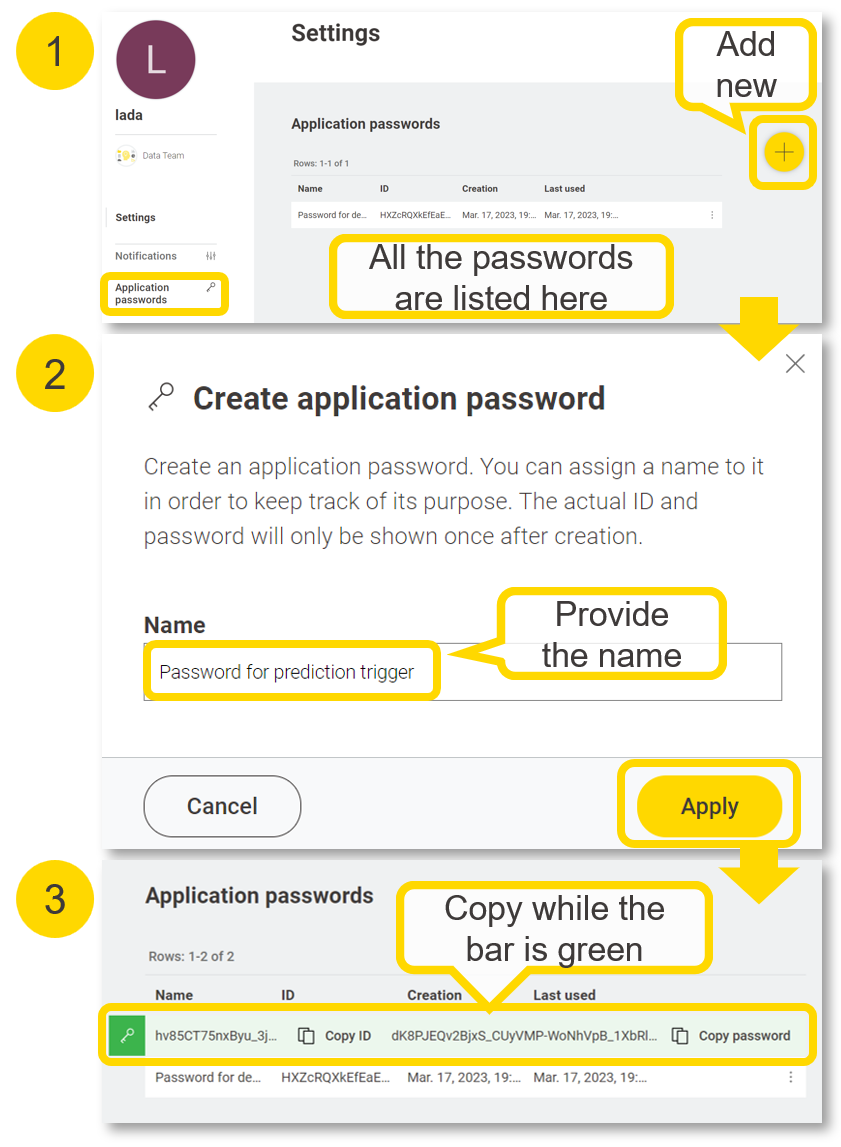
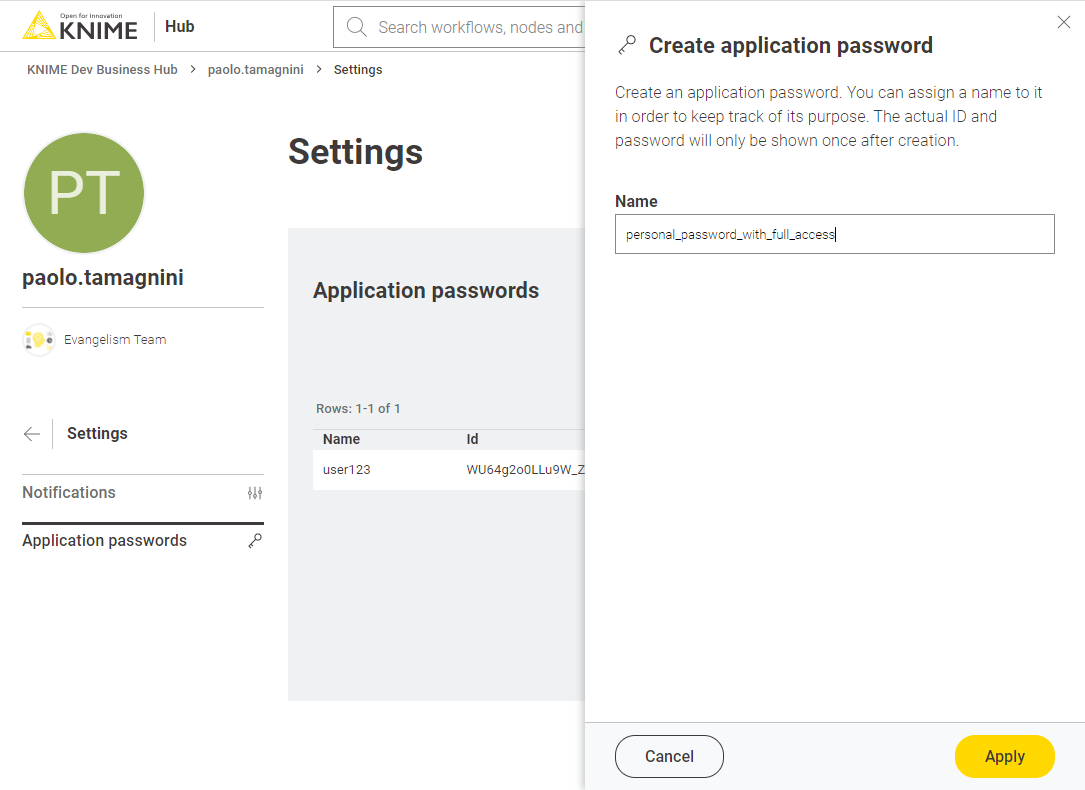
Once the deployment is created you can find it listed under your KNIME Team deployments tab. There you should see the API endpoint (you can get the raw link that returns JSON data or browse the type of API requests via Swagger). You can generate an “application password” for personal use to call the deployment from external clients. It is recommended to have different application password per project so you can delete when the project is over.
Sharing options with other users are available for KNIME deployments. We are going to cover the “Step 4: Share Deployment” topic after we cover the other deployment types (data apps, schedules and triggers).
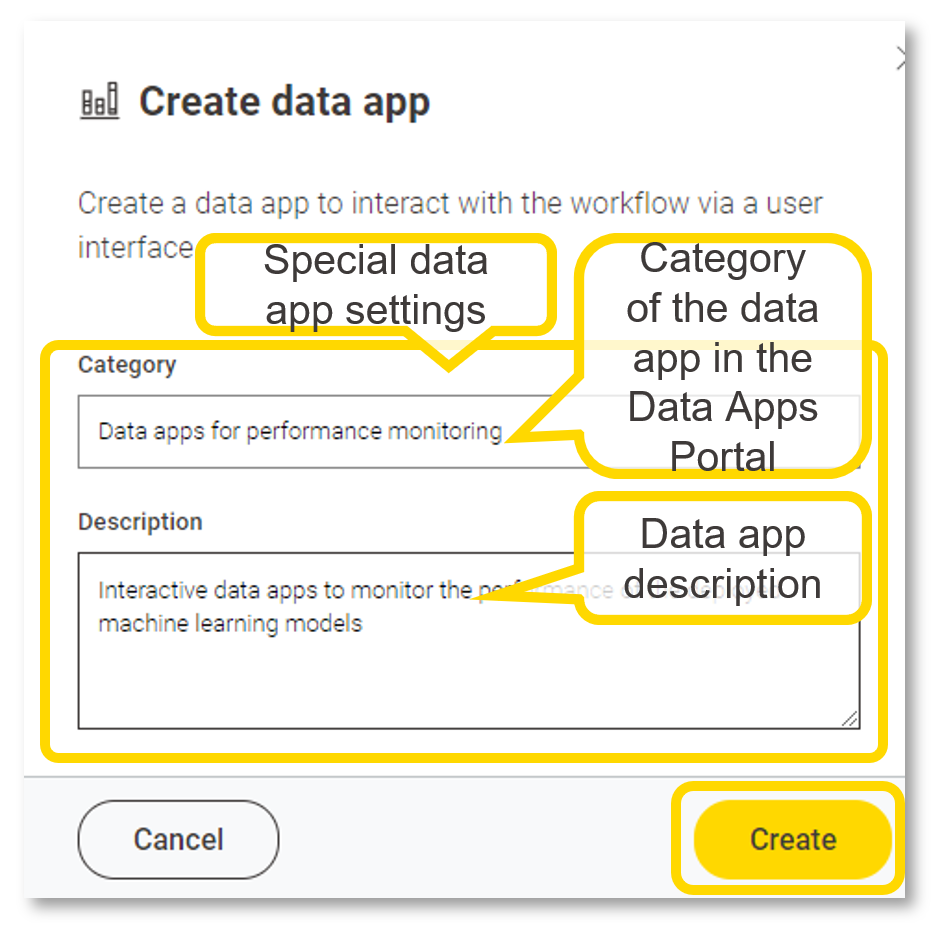
A data app is a web app where data tasks can be performed: any use case usually performed by a Data Engineer, Data Scientist or Data Analyst could be theoretically executed via data apps.
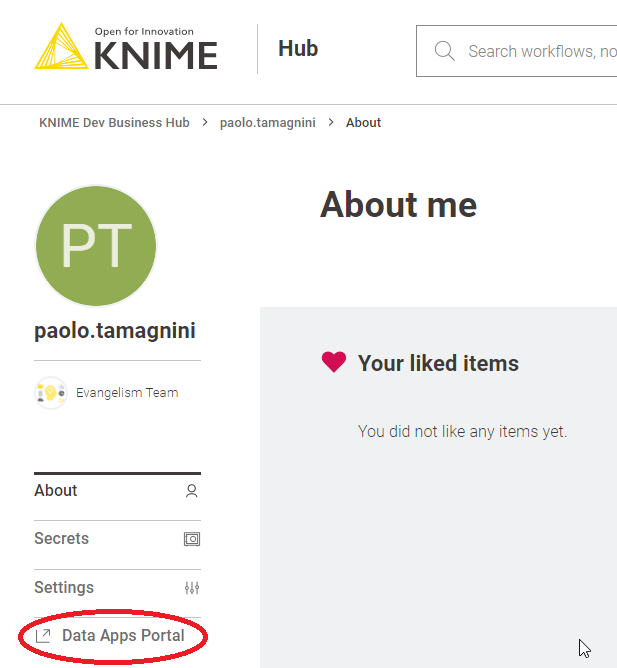
Similarly to the deployment of services, you can deploy the data app from its workflow page, then select the version. The data app should be available listed under KNIME Team deployment tab. You can share with KNIME Business Hub users who are not in your team via the Data App portal and provide details upon deployment.
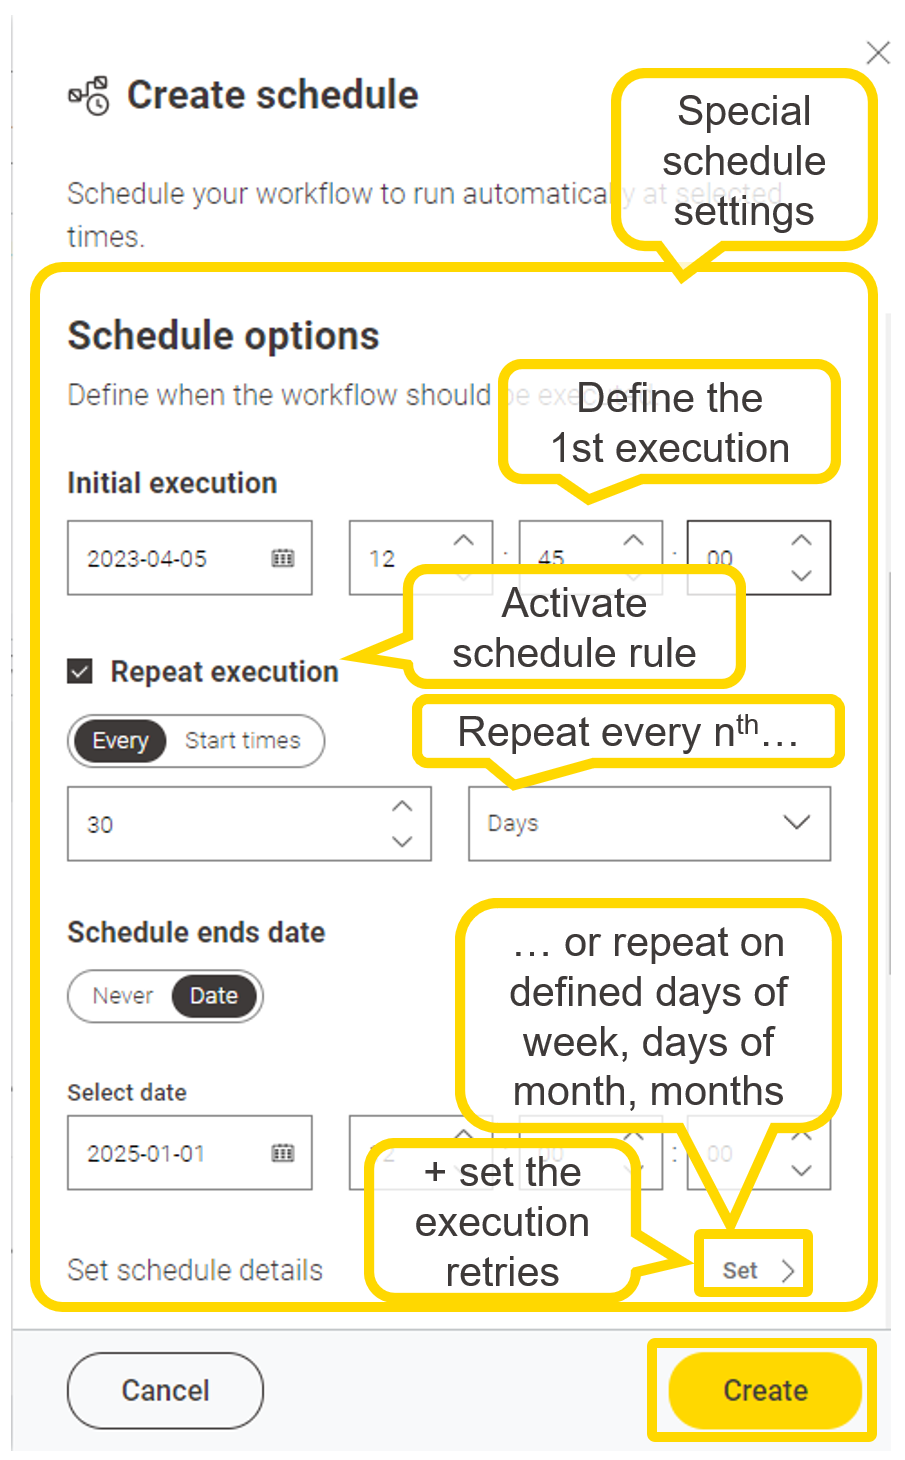
You can automate the execution of the workflow using a schedule: every minute? every hour? every day?
What is automation useful for? Many things! Below a few examples…
for data engineering to move data and update data sources, usually from and to data warehouses and data lakes → KNIME Database nodes
for reporting to generate a PDF with charts and KPIs and automatically send it via emails → KNIME Reporting (Labs) nodes
for machine learning batch deployments to score a chunk of new data (that is what the example workflow is doing in the video above) → many Predictor nodes are available
Similarly to the deployment of services, you can deploy the schedule from its workflow page, then select the version. The data app should be available listed under KNIME Team deployment tab.
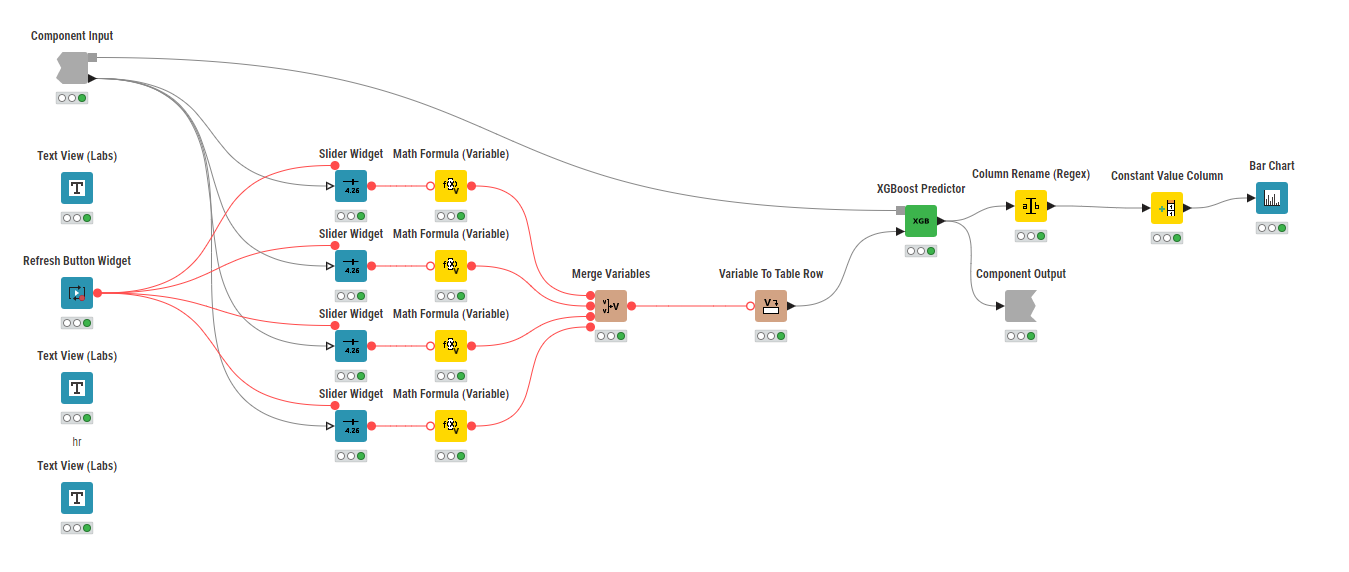
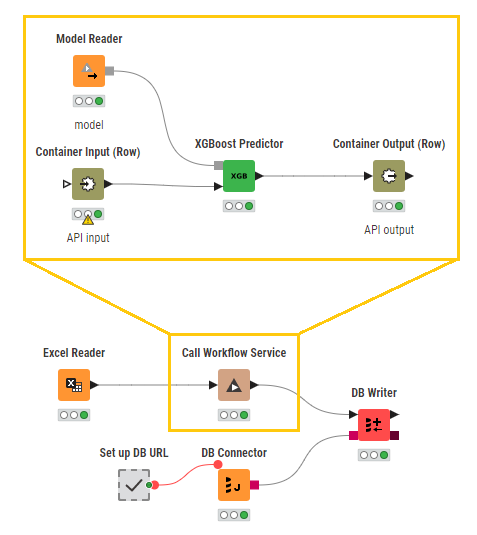
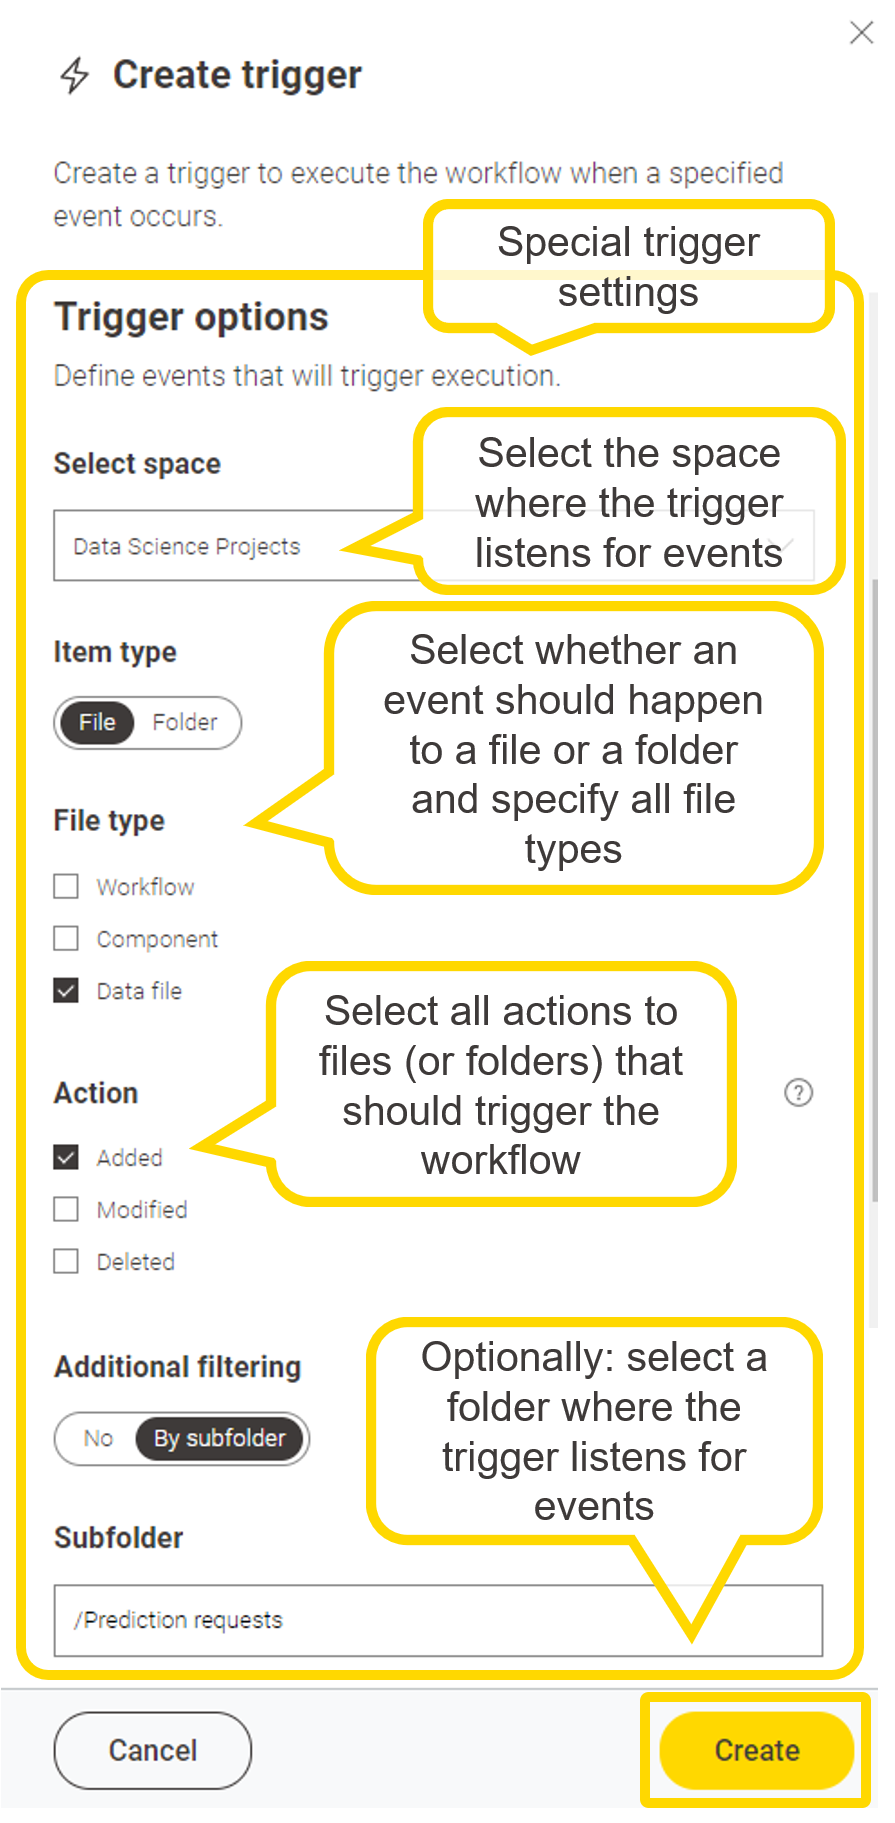
A trigger is essentially setting up a workflow to execute when a certain event happens. The type of the event can be configured when the deployment is created. Let’s take this workflow deployed as a trigger for example:
For this example workflow it might sense to trigger execution when:
See the Excel Reader: a new Excel file appears in a selected folder on KNIME Business Hub. For example the file is uploaded manually by a user and that would mean new predictions are to be scored. In a machine learning setting this means we are scoring new data asynchronously: we trigger the new predictions (unlke a schedule deployment) only when there is new data and we update the database.
See the Model Reader: a new model file appears in a selected folder on KNIME Business Hub. For example the model might have been created by another workflow (via a Model Writer node) that is scheduled to re-train the model every 24 hours or so.
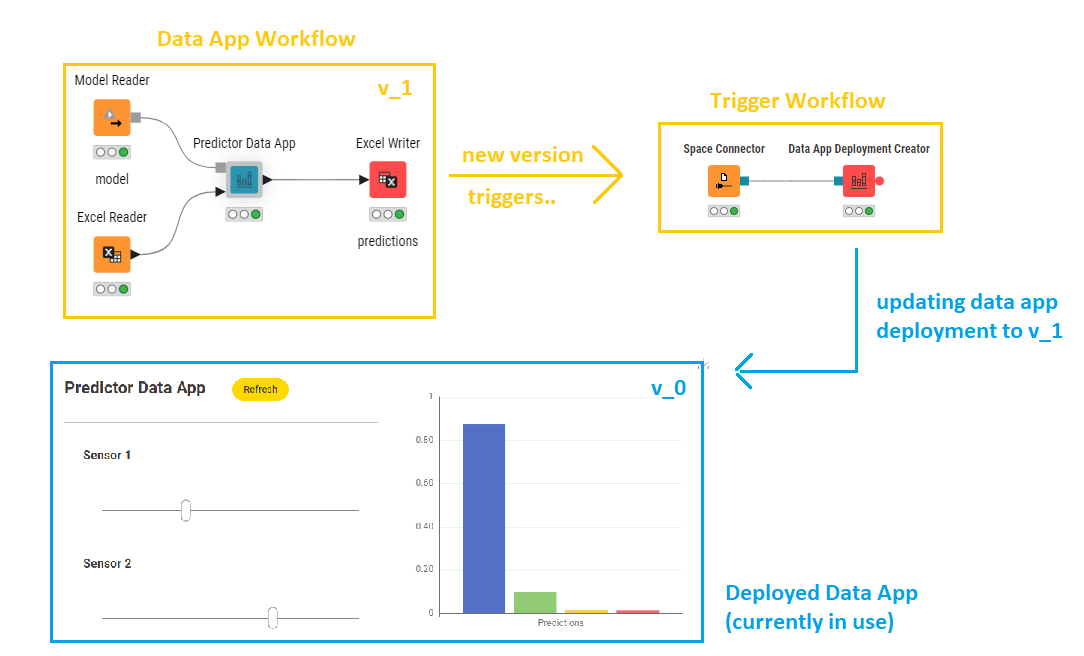
An orchestration example could be making a new version of a data app workflow trigger a second workflow which updates the deployment of the data app. This way the data app end-users get the newest updates on the fly! This would require the workflow deployed as a trigger to have a Data App Deployment Creator node.
Excellent compilation of the steps needed for Business Hub for various scenarios. May be this could be rolled out as a cheat sheet . Keep up the good work of KNIMEing
For service deployments, the API endpoint will become accessible to those users authenticated via their “Application Password”. The users can create or delete application passwords in their user profile settings. These application password can be used in other workflows (via the KNIME Hub Authenticator and Call Workflow nodes), or in a block of code, to call the deployed workflow service.
I have just one quick question regarding Trigger Deployments.
I have run some tests sending multiple files using the API to my test space to trigger an extremely simple test workflow, and I noticed that the jobs is triggered once for each file.
I didn’t see a setting for this, is there a way to run that deployment only once if multiple files are added at around the same time ? I didn’t have the chance to check yet, if the first job is still running, will it run the second one anyway ?
I can’t see to be able to edit my previous post, so just to mention that I did try adding a Wait node to make sure that the job couldn’t be finished immediately, and I still had 2 jobs executed when sending 2 files at the same time.
Did I miss an option somewhere to force that behaviour, that exists in the schedules ?
Hi @Vonwen,
thanks for posting in here your questions.
After double-checking with the KNIME team, I confirm that at the moment there is no setting for the following:
triggering a workflow only after multiple files appear in the folder during a time window.
The trigger will execute always and only once per file
A workaround for this, based on the assumption that you know that multiple files are always created at the same time, is to have your API, or workflow service, to merge these events into 1 file. For example those multiple files could be written directly in as a zip file OR concatenated in a single file. The trigger workflow can then wait for the single file/zip to appear.
The trigger then will work once each time this kind of multi-file-event happens.
On the other hand, I would also keep in mind that executing one job per file should not cause issues if the triggered workflow is designed correctly. For example you can trigger each time a DB Writer node node, then schedule another workflow to read from such DB and perform more actions on the data collected from such files.

 /
/ 


")