Hi @exploredata547,
the banner cannot be disabled directly.
However, I think what you really want if you distribute your AP installation internally via some mechanism, is to fix AP/extensions to a specific version.
You can use centrally managed customization on KNIME Hub for that purpose: Business Hub Admin Guide | KNIME Documentation
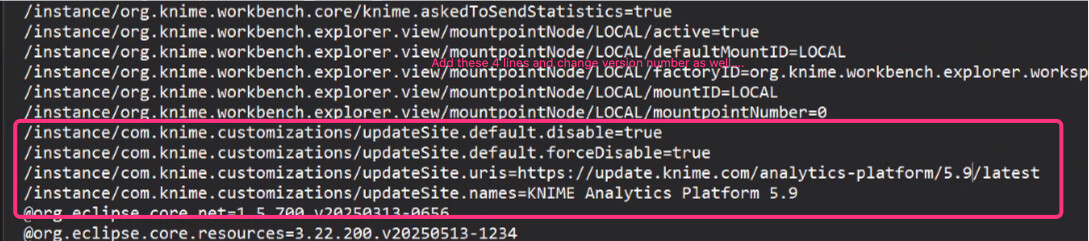
For your example, to remain on a specific version it should look like this in a .epf (“eclipse preference”) file (specifically explained here):
# The URLs of the Update Site as a comma separated list. Has to be a valid URI. Also serves as the identifier of the update site.
/instance/com.knime.customizations/updateSite.uris=https://update.knime.com/analytics-platform/5.5/latest

# The names of the Update Sites, as a comma separated list, that are shown in the
# "Available Software Sites" preference page. The number of names have to match the number of provided URIs.
/instance/com.knime.customizations/updateSite.names=KNIME Analytics Platform 5.5

# Disables all default update sites registered in the product
/instance/com.knime.customizations/updateSite.default.forceDisable=true
To remove the KNIME Community Hub from the listing, you have to create a “customization” via a .yml (YAML) file. As per the first example here:
version: 'customization-v1.0'
mountpoint:
  filter:
    - rule: deny
      predicate:
        type: pattern
        patterns:
          - api.hub.knime.com
        isRegex: false
Then in your .epf file you reference it, providing the filename that you gave it instead of <filename>:
/instance/org.knime.core/knime.core.ap-customization-configuration=${profile:location}/<filename>.yml
To add your company Hub to the AP mountpoints, you need to know your configured “default mount id” (I think the… default in the Hub installation is “knime-business-hub”, but maybe companies personalize it) and replace it in the example below where I wrote <your-hub-default-id>.
/instance/org.knime.workbench.explorer.view/mountpointNode/LOCAL/active=true
/instance/org.knime.workbench.explorer.view/mountpointNode/LOCAL/defaultMountID=LOCAL
/instance/org.knime.workbench.explorer.view/mountpointNode/LOCAL/factoryID=org.knime.workbench.explorer.workspace
/instance/org.knime.workbench.explorer.view/mountpointNode/LOCAL/mountID=LOCAL
/instance/org.knime.workbench.explorer.view/mountpointNode/LOCAL/mountpointNumber=0
/instance/org.knime.workbench.explorer.view/mountpointNode/<your-hub-default-id>/active=true
/instance/org.knime.workbench.explorer.view/mountpointNode/<your-hub-default-id>/authType=OAuth
/instance/org.knime.workbench.explorer.view/mountpointNode/<your-hub-default-id>/factoryID=com.knime.explorer.server.knime_hub
/instance/org.knime.workbench.explorer.view/mountpointNode/<your-hub-default-id>/isCommunityHub=false
/instance/org.knime.workbench.explorer.view/mountpointNode/<your-hub-default-id>/mountID=<your-hub-default-id>
/instance/org.knime.workbench.explorer.view/mountpointNode/<your-hub-default-id>/mountpointNumber=1
/instance/org.knime.workbench.explorer.view/mountpointNode/<your-hub-default-id>/serveraddress=https\://api.example.org
/instance/org.knime.workbench.explorer.view/mountpointNode/<your-hub-default-id>/username=
This also goes into your .epf. Then, as per the documentation here, you specify both as mountpoints to be loaded for new workspaces (also in your .epf):
/instance/org.knime.workbench.explorer.view/defaultMountpoint/defaultMountpoints=LOCAL,<your-hub-default-id>
To make your distributed AP installations aware of your Hub and where to get the profiles, follow this: KNIME Business Hub User Guide | KNIME Documentation
Hope this helps  In case you need additional support, our support team can assist you with the Hub/AP setup via our support portal/email.